Operating System Images
Overview
Experimenters using Merge-based testbeds can specify the operating system that is installed on their experiment nodes. There are a number of supported operating system images (known as "images" henceforth) that are available at any one time. The facility operators support a list of "default images" when the facility is created. Users can also create custom images based on these supported images.
The list of images can change as new images are added, older images are removed, and users make
their own custom images. User images can be access mode can be Public, Protected, or Private. Depending
on the policy of the Merge Portal, users may or may not have access to custom user images because of this.
Images are stored on and associated with facilities. (A facility is a distinct cluster of machines available for experimenters to use.) When a user creates a custom image, it is only available on the same facility it was created on. The image is stored on that specific facility. This may need to be taken into account when specifying images for experiment nodes.
Currently Merge does not check image names before materializing an experiment, so image specification errors are a materialization time error. If this happens, you will need to fully relinquish the experiment and re-realize it the experiment model with more strict constraints or create the needed image on the facility.
Listing images
The listing of available images is shown in Launch and the mrg command line client. By default,
the listings show images that are personally available to you. This is usually just images you've created,
There is a filter setting that toggles between your images and all images you can access. These images
are other custom images that users have created or images supplied by facility operators, images that are
always available on that facility.
The listing of images show the following information:
- Name - the name of the image. This is what is used in the experiment model to specify the image to use.
- Size - the size of the image on disk.
- OS - the operating system the image is based on.
- Description - Text describing the image. If this is of the form Standard [Facility] Image, then this image is officially supported by the given facility.
- Creator - Username of the account which created the image. For facility images, this will be the facility creator or operator.
- Facilities - a list of facilities that support this image.
- Access - the access mode for this image. One of
Public,Protected, orPrivate. This mode is configured by the image creator. - Created - when the image was created.
- Status - Status of the image. Usually
Readymeaning the image can be used.
Listing images in Launch
To view available images in Launch, just click the Images entry in the dashboard menu.
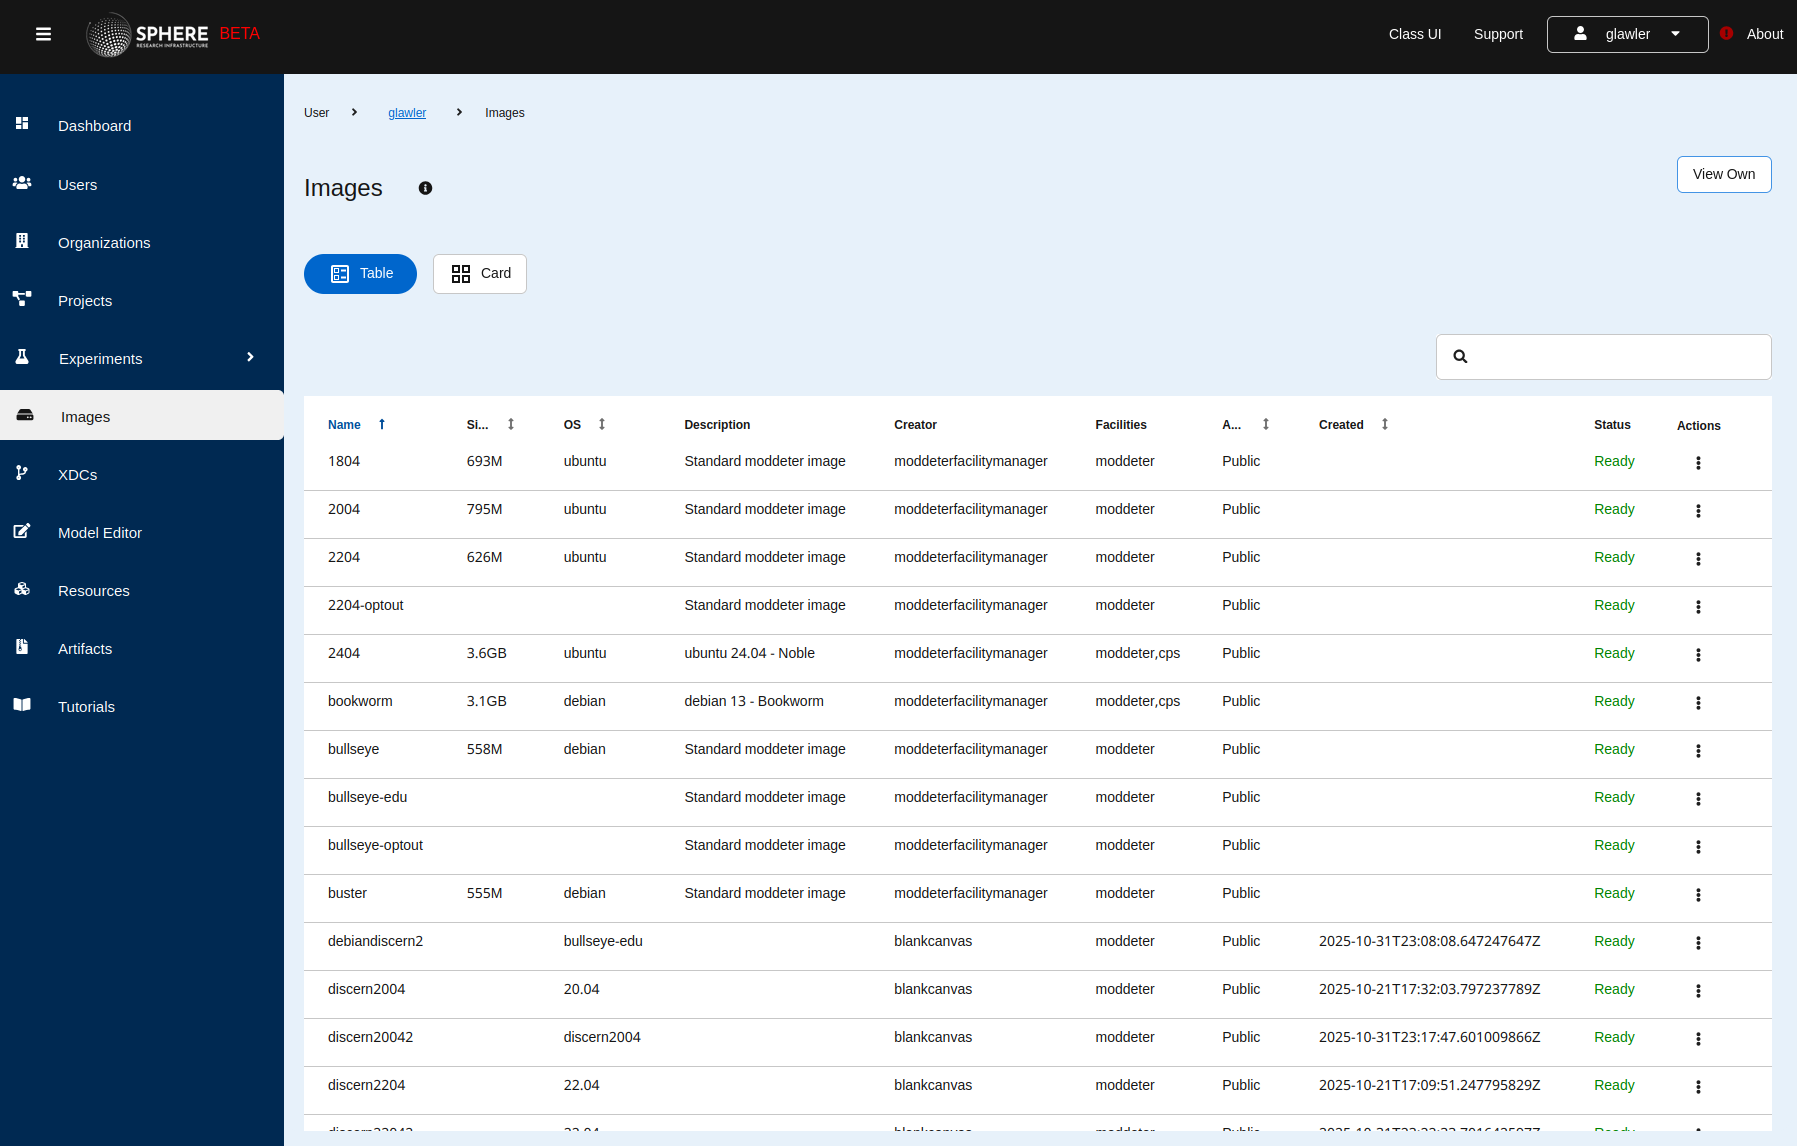
To toggle between your own images and all images available to you, click the View Own / View All
button. (The button text changes depending on the current mode.)
Note that in this snapshot the 2004 Ubuntu image is available on the moddeter and cps facilities.
And there are a few custom user images like discern2004. All images shown are Public.
Listing images on the command line
To view available images on the command line, use the mrg list images command.
User created images:
glawler@kaylee:~$ mrg list images
Name            Size    OS                 Creator    Facilities    Status        Access Mode    Image Mode    Created                          Status Message    Description
ddosbullseye            debian bullseye    glawler    moddeter      ImageReady    Public         DiskOnly      2026-01-20 21:39:38 +0000 UTC                      Standard Debian Bullseye with DDOS analysis tools installed.
All images available to the user, use mrg list images --filter all:
glawler@kaylee:~$ mrg list images --filter all
Name               Size     OS                 Creator                    Facilities       Status        Access Mode    Image Mode    Created                          Status Message    Description
1804               693M     ubuntu             moddeterfacilitymanager    moddeter         ImageReady    Public                                                                          Standard moddeter image
2004               795M     ubuntu             moddeterfacilitymanager    moddeter         ImageReady    Public                                                                          Standard moddeter image
2204               626M     ubuntu             moddeterfacilitymanager    moddeter         ImageReady    Public                                                                          Standard moddeter image
2204-optout                                    moddeterfacilitymanager    moddeter         ImageReady    Public                                                                          Standard moddeter image
2404               3.6GB    ubuntu             moddeterfacilitymanager    moddeter, cps    ImageReady    Public                                                                          ubuntu 24.04 - Noble
bookworm           3.1GB    debian             moddeterfacilitymanager    moddeter, cps    ImageReady    Public                                                                          debian 13 - Bookworm
bullseye           558M     debian             moddeterfacilitymanager    moddeter         ImageReady    Public                                                                          Standard moddeter image
bullseye-edu                                   moddeterfacilitymanager    moddeter         ImageReady    Public                                                                          Standard moddeter image
bullseye-optout                                moddeterfacilitymanager    moddeter         ImageReady    Public                                                                          Standard moddeter image
buster             555M     debian             moddeterfacilitymanager    moddeter         ImageReady    Public                                                                          Standard moddeter image
ddosbullseye                debian bullseye    glawler                    moddeter         ImageReady    Public         DiskOnly      2026-01-20 21:39:38 +0000 UTC                      Standard Debian Bullseye with DDOS analysis tools installed.
debiandiscern2              bullseye-edu       blankcanvas                moddeter         ImageReady    Public         DiskOnly      2025-10-31 23:08:09 +0000 UTC
discern2004                 20.04              blankcanvas                moddeter         ImageReady    Public         DiskOnly      2025-10-21 17:32:04 +0000 UTC
discern20042                discern2004        blankcanvas                moddeter         ImageReady    Public         DiskOnly      2025-10-31 23:17:48 +0000 UTC
discern2204                 22.04              blankcanvas                moddeter         ImageReady    Public         DiskOnly      2025-10-21 17:09:51 +0000 UTC
discern22042                22.04              blankcanvas                moddeter         ImageReady    Public         DiskOnly      2025-10-31 23:22:34 +0000 UTC
discerndebian               bullseye-edu       blankcanvas                moddeter         ImageReady    Public         DiskOnly      2025-10-21 19:43:04 +0000 UTC
tc12                                           moddeterfacilitymanager    moddeter         ImageReady    Public                                                                          Standard moddeter image
tc13                                           moddeterfacilitymanager    moddeter         ImageReady    Public                                                                          Standard moddeter image
ubuntu-optout                                  moddeterfacilitymanager    moddeter         ImageReady    Public                                                                          Standard moddeter image
windowstest                 windows            cse952tehq                 moddeter         ImageReady    Public         DiskOnly      2025-11-01 18:51:53 +0000 UTC                      testing windows os
Creating a custom image
To create a custom image you must have an existing experiment node up and running. From that node, the new image is made. So create an experiment and materialize it. Login to the experiment node and update the image with whatever software or configurations you need. Then create the new image from the image on the node.
Instructions below assume you have updated the existing image on the experiment node already.
Image names can only contain lowercase letters. No punctuation or other symbols are allowed. If the name does contain non-lowercase letters, image creation will immediately fail with an error. In the future this constraint will be relaxed.
Note that images can only be created from virtual machine nodes. Images cannot be created from bare metal nodes. If you need an image created from a bare metal node, contact the facility operators.
Creating a custom image in Launch
To create a new image in Launch, browse to the node you want to create the image from.
- Click
Experimentsin the dashboard view. - Click
Activations. - Click the materialization that contains your experiment node.
- Click
Details - Click the
Actionsmenu on the right of the node - Click
Create Image
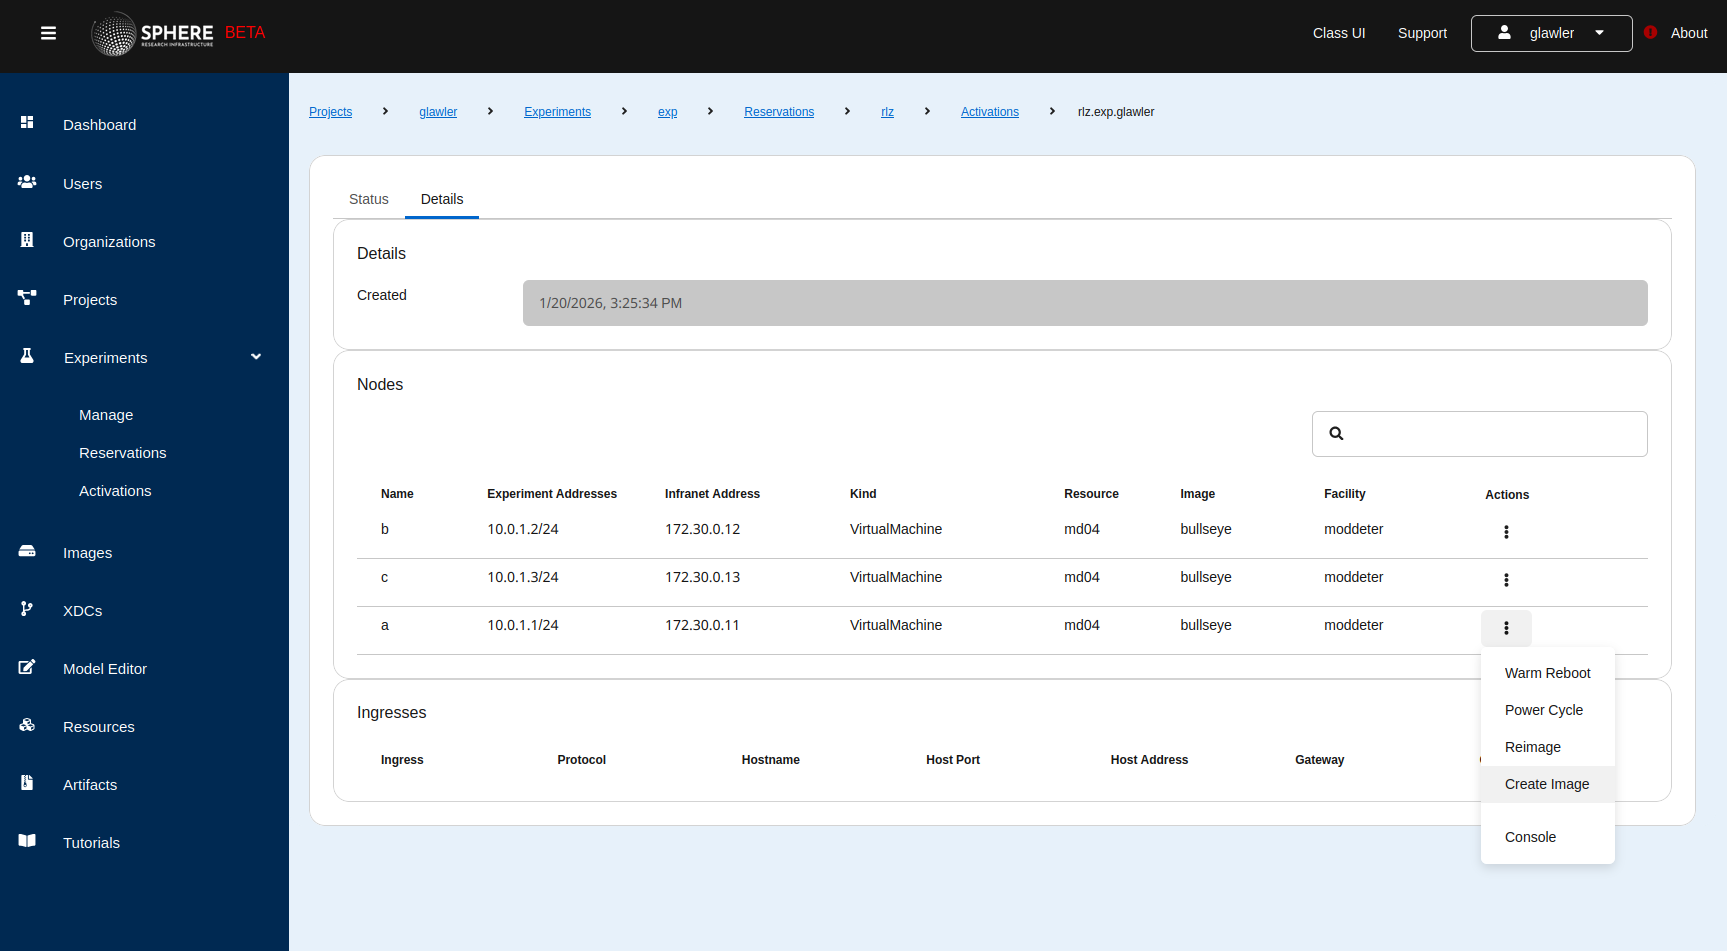
A dialog will pop up. Fill it out with the details of the new image. Note that the materialization name and node name are filled out for you and cannot be changed.
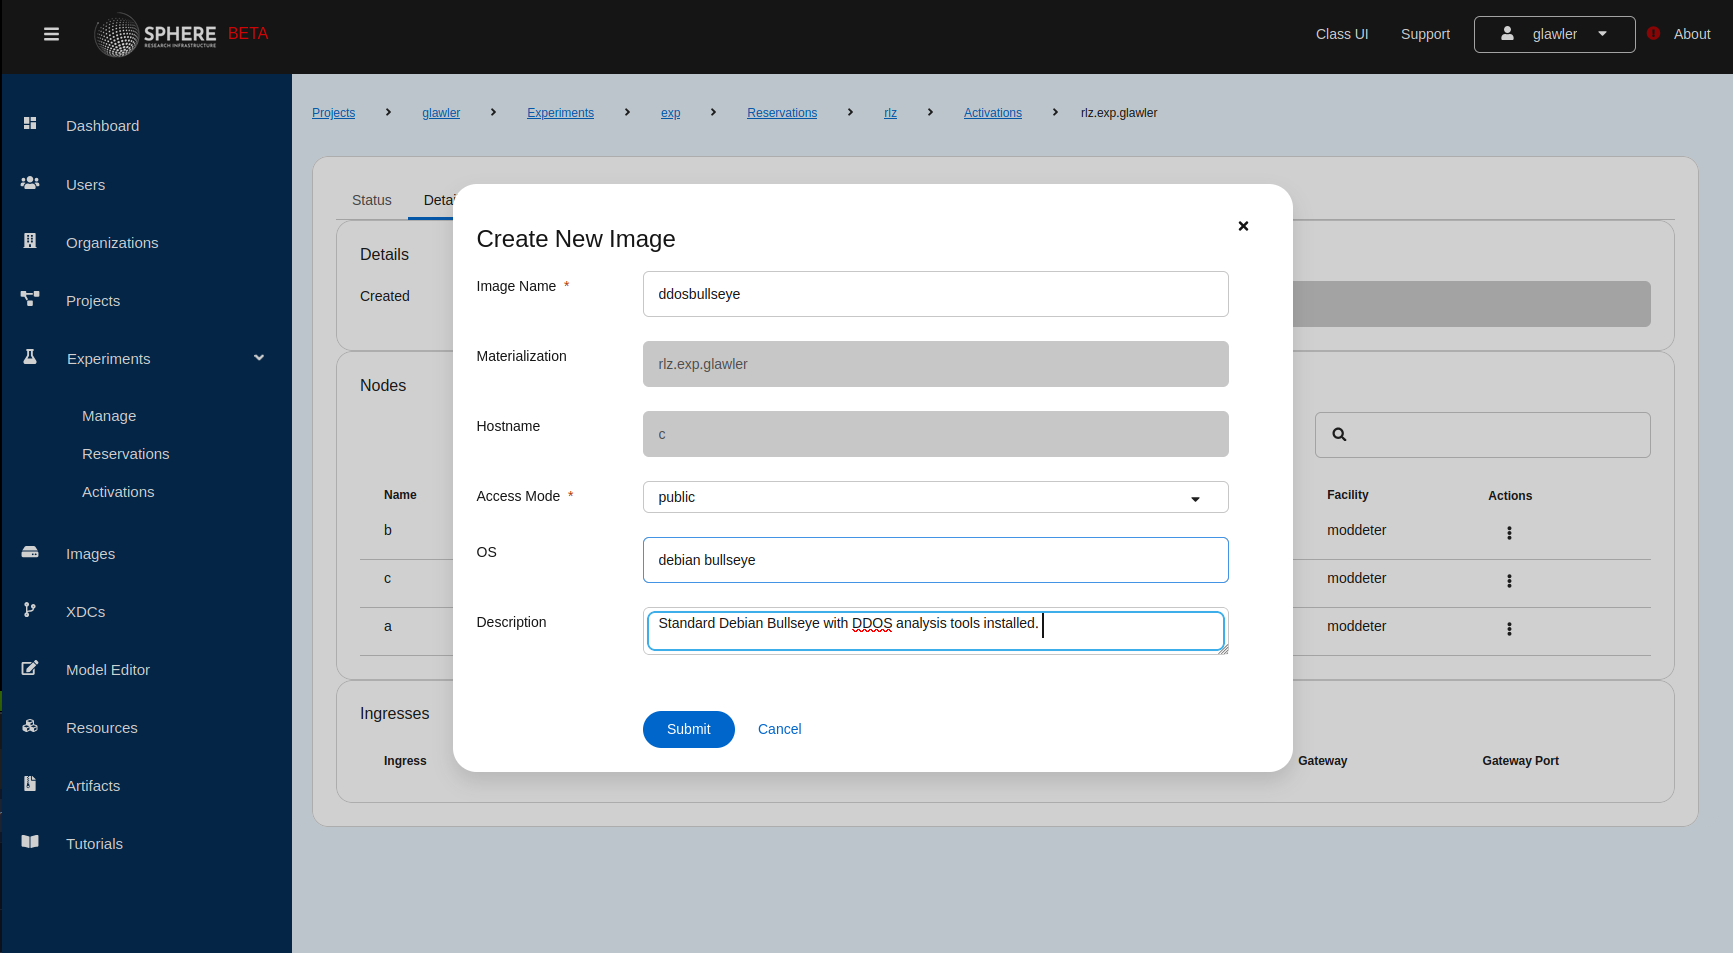
When you click Submit the image creation process will start. It will take a few minutes to complete. Until then the status of the image will show as Not Ready.

Once the status of the image shows Ready, the new image is ready to be used.

Creating a custom image on the command line
To create a new image from the command line, use the mrg command new image. This is the help for the command mrg new image --help:
glawler@kaylee:~$ mrg new image -h
create a new image from an existing virutal machine in a materialization

Usage:
  mrg new image <realization>.<experiment>.<project> <node> <name> [flags]

Flags:
      --description string   Description of the image
  -h, --help                 help for image
  -m, --mode enum            access mode: one of [Public, Protected, Private] (default: Public)
So to create a new image from the node "router" in the materialization rlz.exp.glawler you'd do the following:
mrg new image rlz.exp.glawler router myrouterimage --description "Ubuntu 22.04 updated with network tools"
The image creation process takes a few minutes. You can check the status of the image via the mrg show image command. Look
for the Status field.
This image is not yet ready.
glawler@kaylee:~$ mrg show image myrouterimage
Name: myrouterimage
Size:
OS:
Creator: glawler
Facilities: moddeter
Status: ImageNotReady
Access Mode: Public
Image Mode: DiskOnly
Created: 2026-01-20 22:27:12 +0000 UTC
Status Message: Creating...
Description: Ubuntu 22.04 updated with network tools
This image is ready for use.
glawler@kaylee:~$ mrg show image myrouterimage
Name: myrouterimage
Size:
OS:
Creator: glawler
Facilities: moddeter
Status: ImageReady
Access Mode: Public
Image Mode: DiskOnly
Created: 2026-01-20 22:27:12 +0000 UTC
Status Message:
Description: Ubuntu 22.04 updated with network tools
Note that the size is optionally set by the facility on which the node is hosted. So it may be empty. To set the OS field use the mrg update image command.
Updating an image
Image descriptions, OS field, and Access Mode can be updated via Launch and mrg. In Launch browse to the node in the materialization details page, click the Action menu and choose Update. A dialog will pop up letting you update these fields.
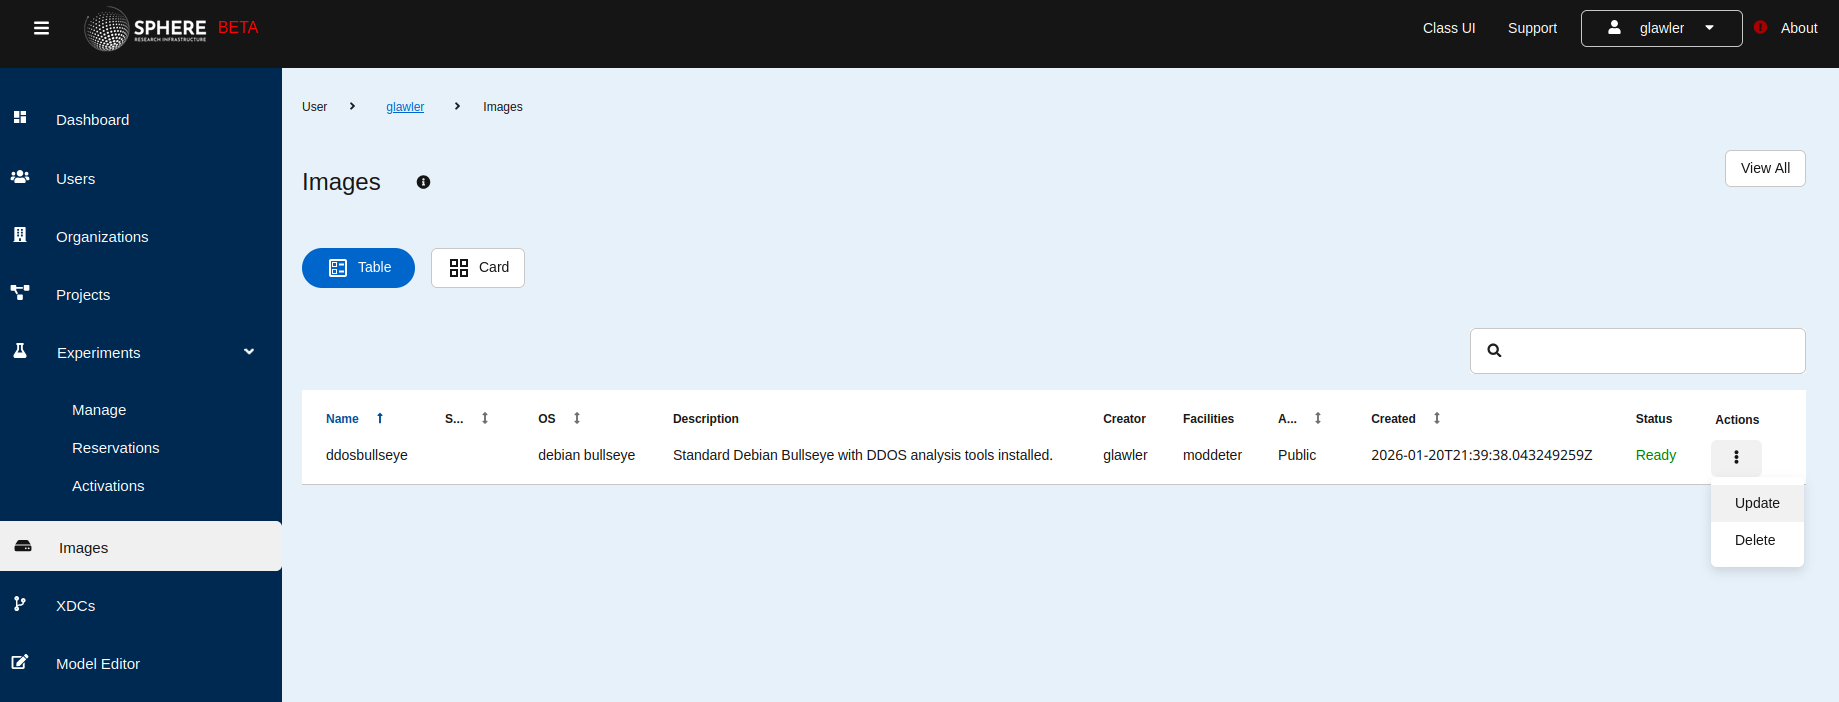
On the command line use the command mrg update image. The syntax and options for that is shown in the --help for the command.
glawler@kaylee:~$ mrg update image
Update image information

Usage:
  mrg update image [command]

Available Commands:
  access      Set the images access mode. Access mode: one of [Public, Protected, Private]
  description Set the image description
  os          Set the image operating system
  size        Set the image size

Flags:
  -h, --help   help for image
Deleting an image
To delete an image in Launch follow the instructions for updating an image, but select Delete instead of Update in the actions menu.
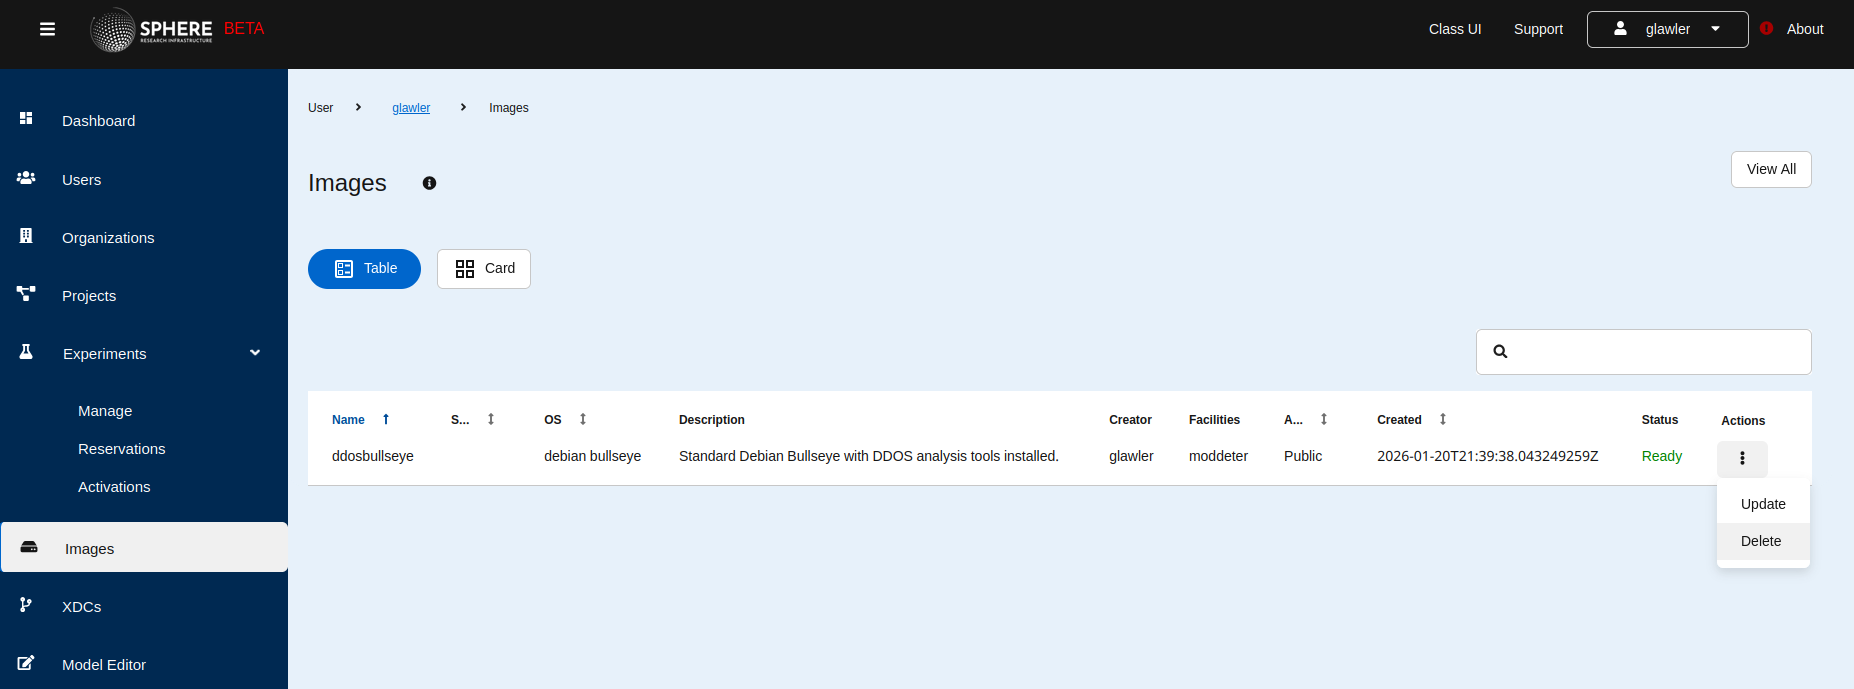
To delete an image from the command line, use the command mrg delete image <name>. Here is the help for the command.
glawler@kaylee:~$ mrg delete image --help
Delete an image

Usage:
  mrg delete image <name> [flags]

Flags:
  -h, --help   help for image
Using an image
To specify an image for an experiment node, include it in the node declaration in the experiment model. The syntax is image==[name],
where [name] is a valid image name.
Here is a complete example which had two connected nodes, each with a different image installed:
from mergexp import *

net = Network('example', addressing==ipv4, routing==static)

cat = net.node('cat', image=='ubuntu2024')
dog = net.node('dog', image=='debianbullseye')

net.connect([cat, dog])

experiment(net)
Note that the image name is just a string. When compiling the model, the image name is not checked against the current list of images. (This is mentioned in the Overview as well, but repeated here for emphasis.) This is because the nodes are imaged at materialization time, not model compilation time. So the compilation cannot determine if a given image will exist when the experiment is compiled. If the image is not found at materialization time, the user will need to fully relinquish and re-realize the experiment model (or create the image needed on the facility).